Triggers
Triggering means managing start, stop, intensity change of your cuelists by external event.
Trigger Recorder with the following methods:
- Time schedule
- ArtNet, ArtNet DMX, GPIO trigger
- MIDI
- Web panel simplified for end-users and advanced for admins
- iOS / Android application
We can adapt our software to UDP/OSC/... triggering in short term on demand.
Time Scheduler
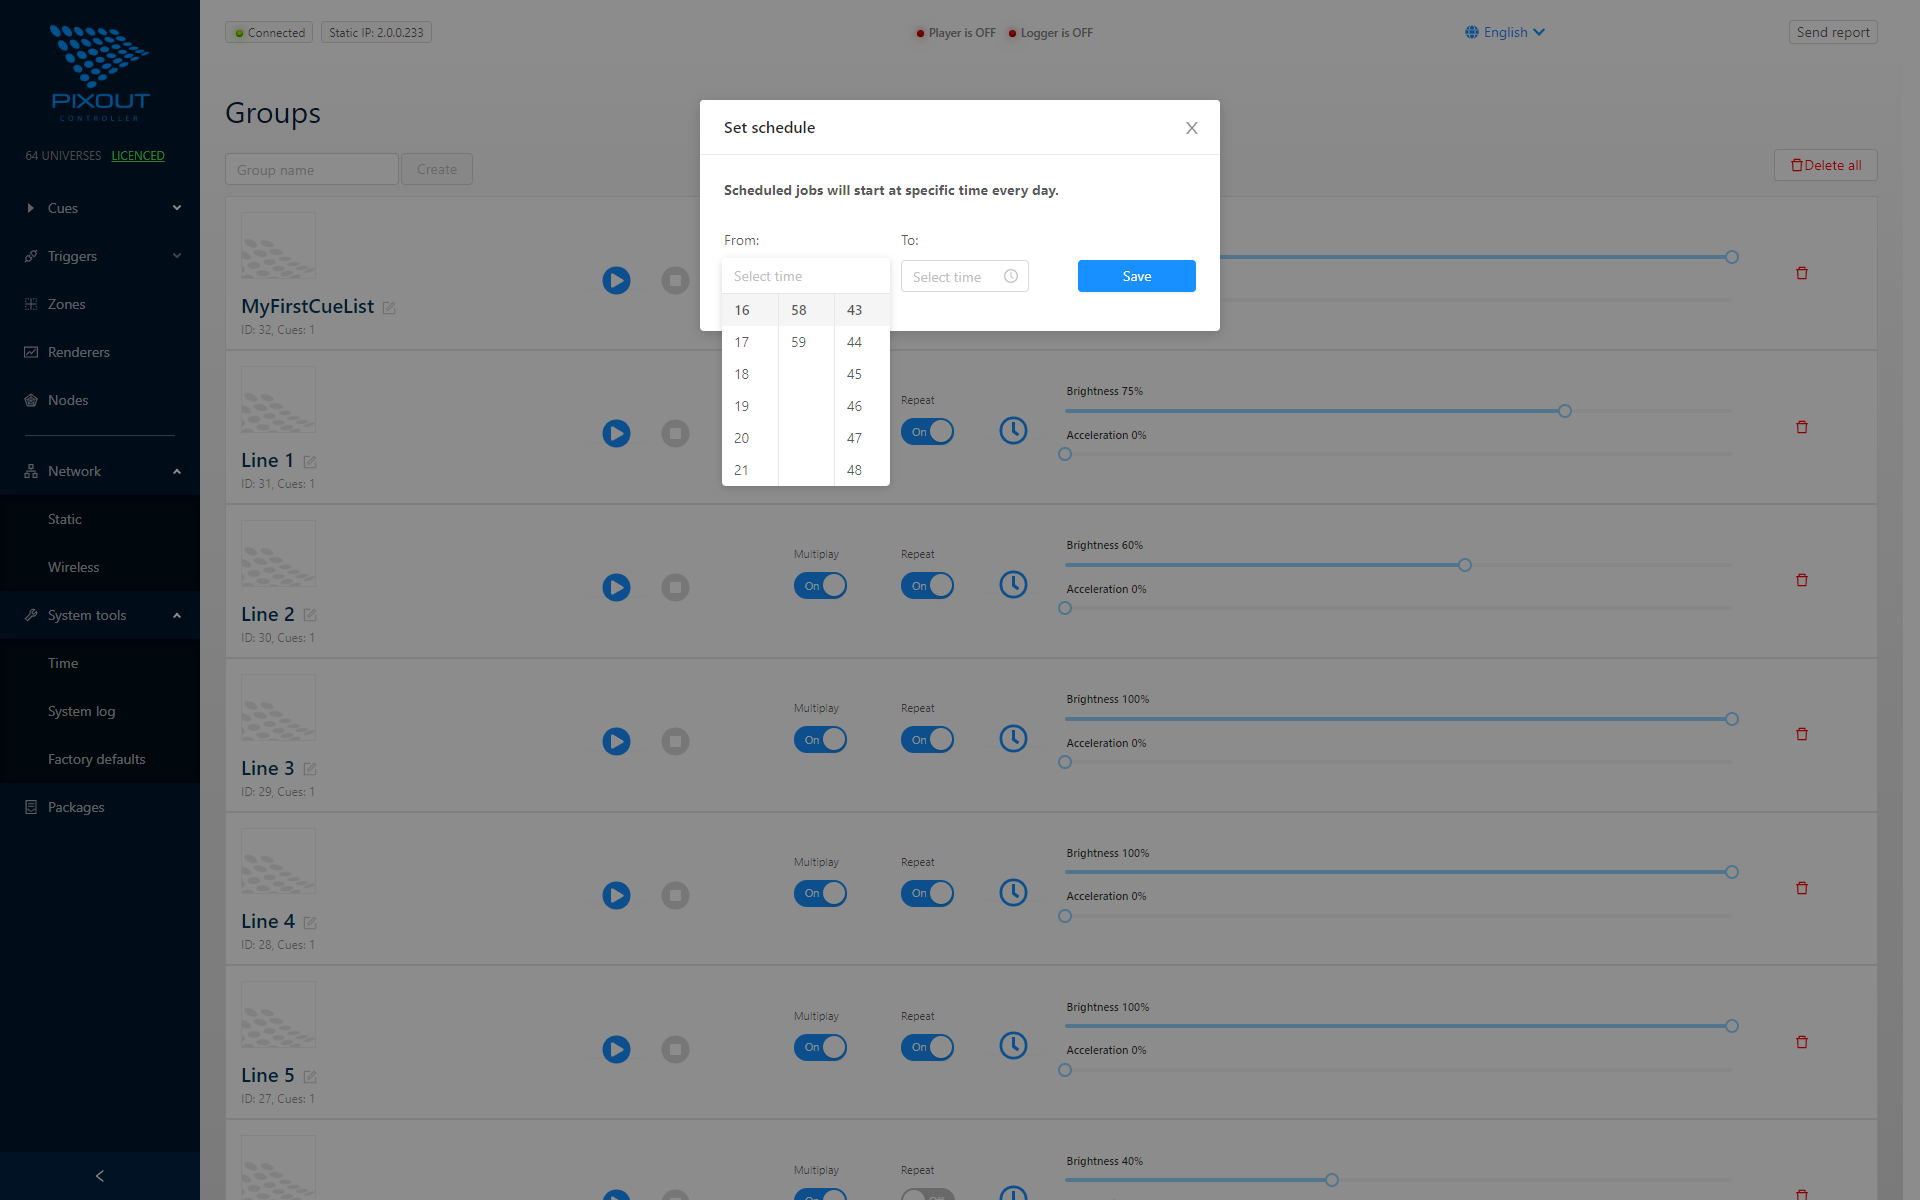
You may schedule activity for every cuelist. Go to Cues > Groups and click the clock icon. In the opened window specify hour, minute and second for start and stop selected cue.
You can't specify the date, so the cuelist will be scheduled for the mentioned time every day: if you specify 17:45 start time for cuelist, it will start playing at this time every day.
Pixout ArtNet Recorder S-100 doesn't have a real time clock and to sync time you need to have wireless connection to the Internet or make manual time sync from System Tools page every time after you switch on the device. Models with RTC: I-100, M-100
ArtNet Triggering
Art-Net triggering allows you to play or stop specified cuelist using Art-Net trigger command (ArtTrigger).
| Key | Subkey | Action |
|---|---|---|
| 1 | cuelist number | Play cuelist |
| 2 | cuelist number | Stop cuelist |
| 3 | intensity value | Set intensity |
You can check ArtNet triggering with DMX-workshop software, yet this approach is very rarely used.
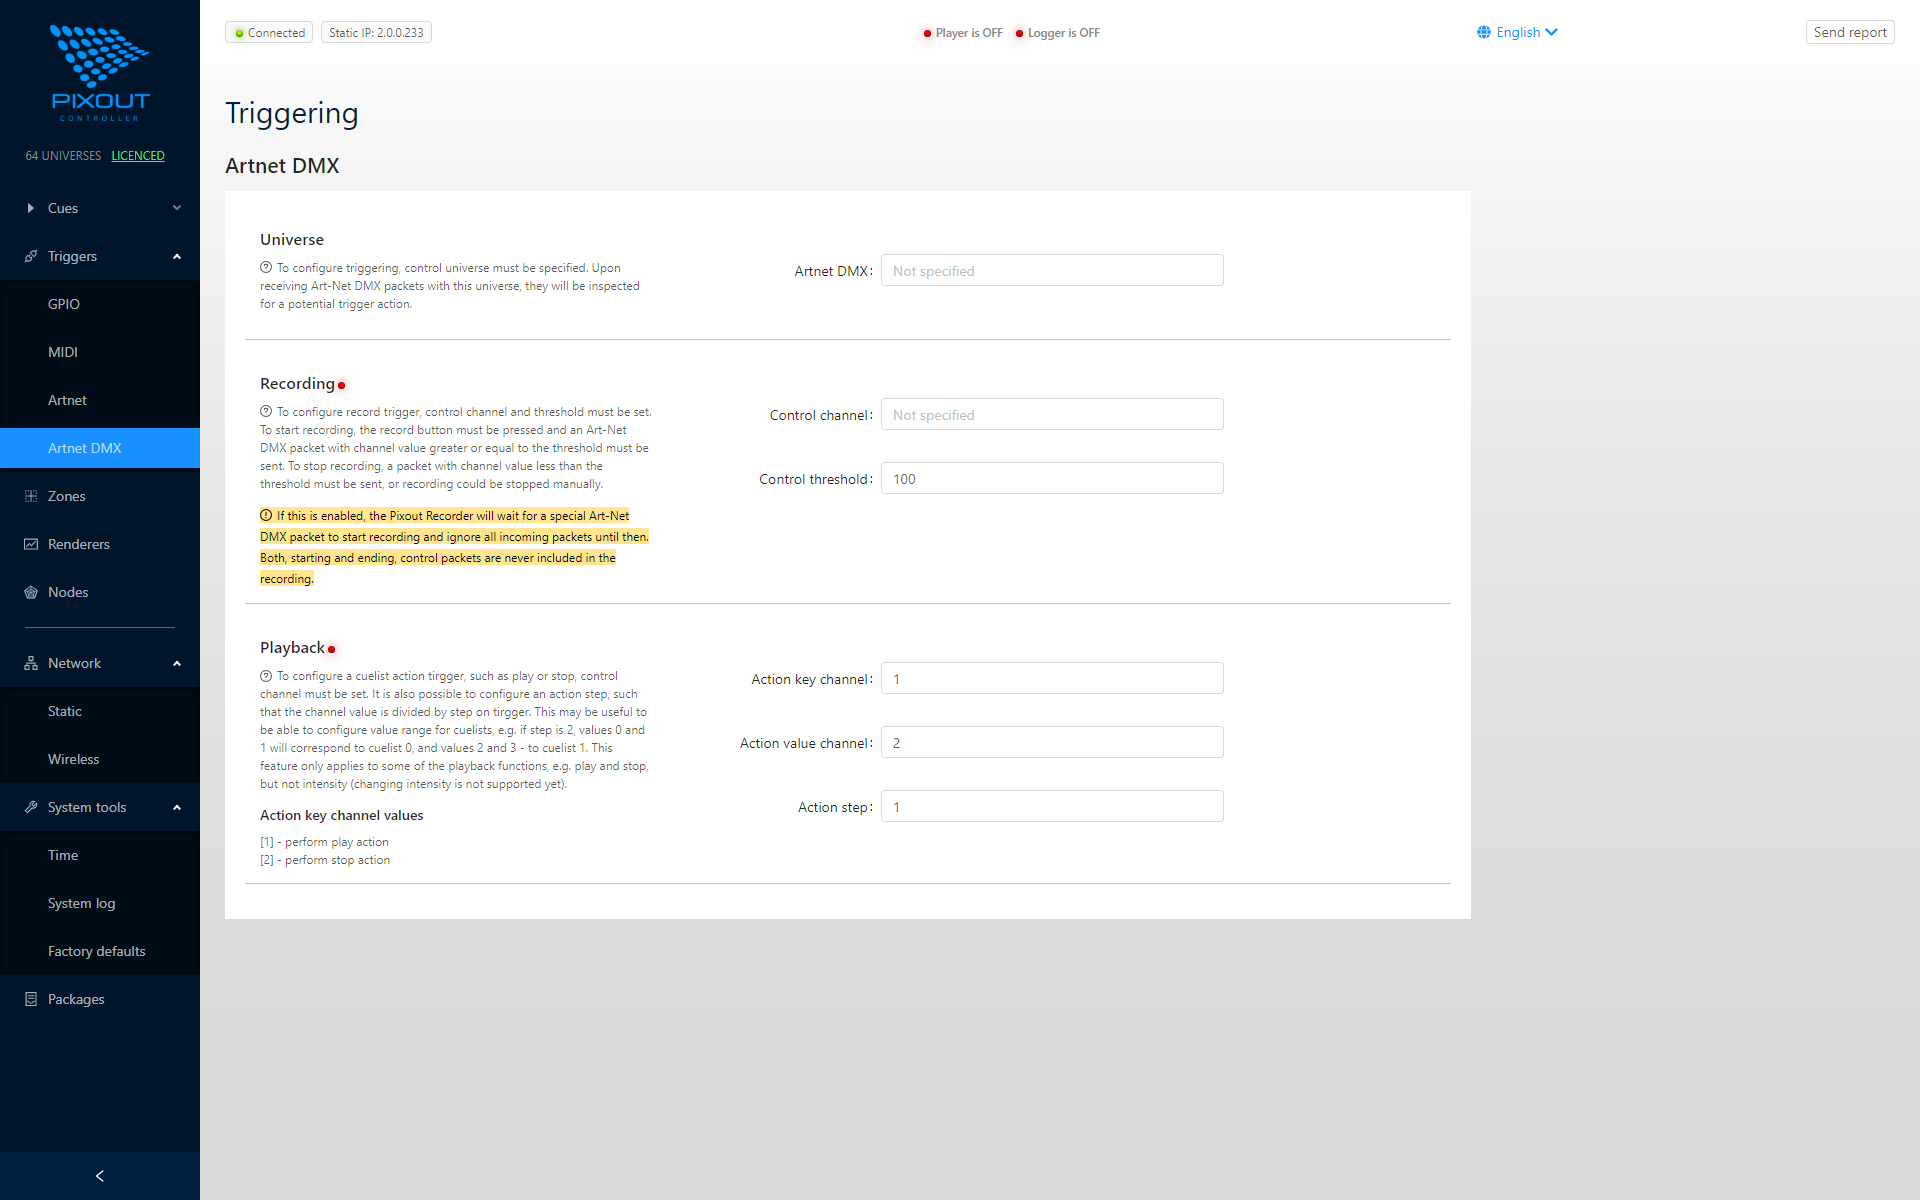
ArtNet DMX Triggering
Another option is to trigger the cuelist by DMX value inside the ArtNet package. You should define the exact universe first. Set the General > Universe to value in range 1-32767. This will specify the universe from the packet that The Recorder will interpret as a trigger.
Recording Trigger
Cue recording start/stop is triggered from outside by the Artnet DMX package.
-
Set Recording > Control > Channel to value in range 1-512
This specifies the channel in a packet that The Recorder will inspect to start or stop recording.
-
Set Recording > Control > Threshold to value in range 1-255
This specifies value that controls whether recording is to be started or stopped. If the Recorder receives a packet with channel value equal to or greater than this setting, it starts recording; if less, it will stop recording.
The Recorder is configured to start/stop recording using ArtNet DMX trigger, when both sections filled shows ON icon.
To start recording:
- Go to Cuelist section
- Select prepared cuelist
- Click the Record button
Now the Recorder is waiting for ArtNet data.
Playback Trigger
Cue Playback functions like Start/Stop/Intensity are triggered externally by the Artnet DMX package.
This section has 3 fields:
| Field | Description |
|---|---|
| Action channel | DMX channel for triggering |
| Action value channel | DMX channel for triggering parameter value |
| Action Step | Step value |
In the first DMX channel you need to send value 1 for play or 2 for stop. In the second DMX channel value should be specified cuelist ID.
For Key channel 1, Value channel 2, and Step 1:
To start playing cuelist 10, send DMX data: 0x01, 0x0A
The Recorder is configured to perform playback actions using ArtNet DMX trigger, when corresponding sections show ON icon. Recording should not be in progress, if you want the Recorder to listen to the trigger.
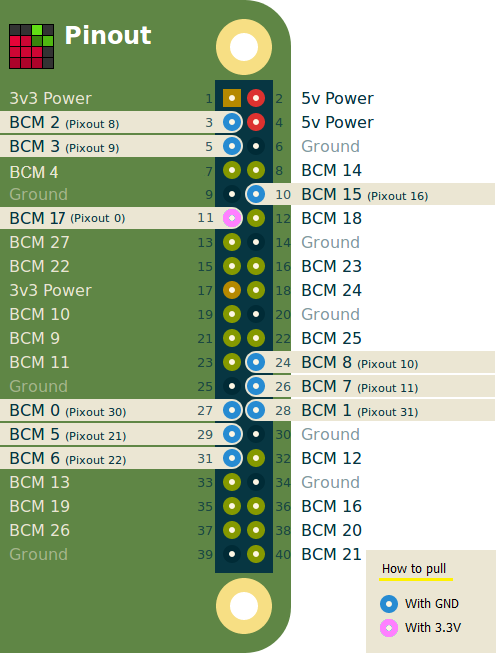
GPIO Trigger
Use GPIO pinout to trigger DMX action. It will allow to toggle specified cuelist using GPIO pull-up button on a PIN. If you click the button once toggle will be ON and cuelist will start playing, and if you click button for the second time toggle will go OFF and cuelist will be stopped.
Please find GPIO PIN numbers at the bottom of this page. To configure GPIO triggering, go to Triggering > GPIO and choose cuelist that should be associated with The Recorder's PIN.
Triggering Policies
| Policy | Description |
|---|---|
| Press-Release (default) | Action triggered upon pressing and releasing the button (release no sooner than 10ms after press). Second Press/Release on same cuelist ID stops it; different cuelist ID starts playing. |
| Press-Trigger-Release-Trigger | Sends two triggers: one on Press, one on Release (release no sooner than 10ms after press). Button pressed = cuelist plays, released = cuelist stops. |
If you need to change triggering policy please write to support team.
- Blue pins pulled with GND
- Pink pins pulled with 3.3V to get it triggered
It would be beneficial if you use Pixout PIN numbering. We have our own numeration system, so don't get scared. It is very easy to figure out how it works altogether with "classic" numeration. By pressing on the next GPIO, which is linked to corresponding cuelist, the previous one will be stopped automatically.
MIDI Trigger
Use triggering from external devices such as MIDI or Lighting desk or other to manage cue. Using MIDI commands you can select cuelist, change speed or brightness. Every time the button is clicked, it would trigger or stop the cuelist. The Recorder can also output control change values from 0 to 100 controlled by faders. Two of these channels are assigned to brightness and speed.
MIDI Commands
| Command | CID | Parameter | Action |
|---|---|---|---|
| On note | 0x09 | Pitch = cuelist number | Toggle cuelist playing/stopping |
| On control change | 0x0B | Channel0, Instrument = 0-100 | Brightness |
| On control change | 0x0B | Channel1, Instrument = 0-100 | Speed |
Any external device can be connected with a USB port, so this type of triggering is available only for unboxed versions or models: I-100, WS-100.
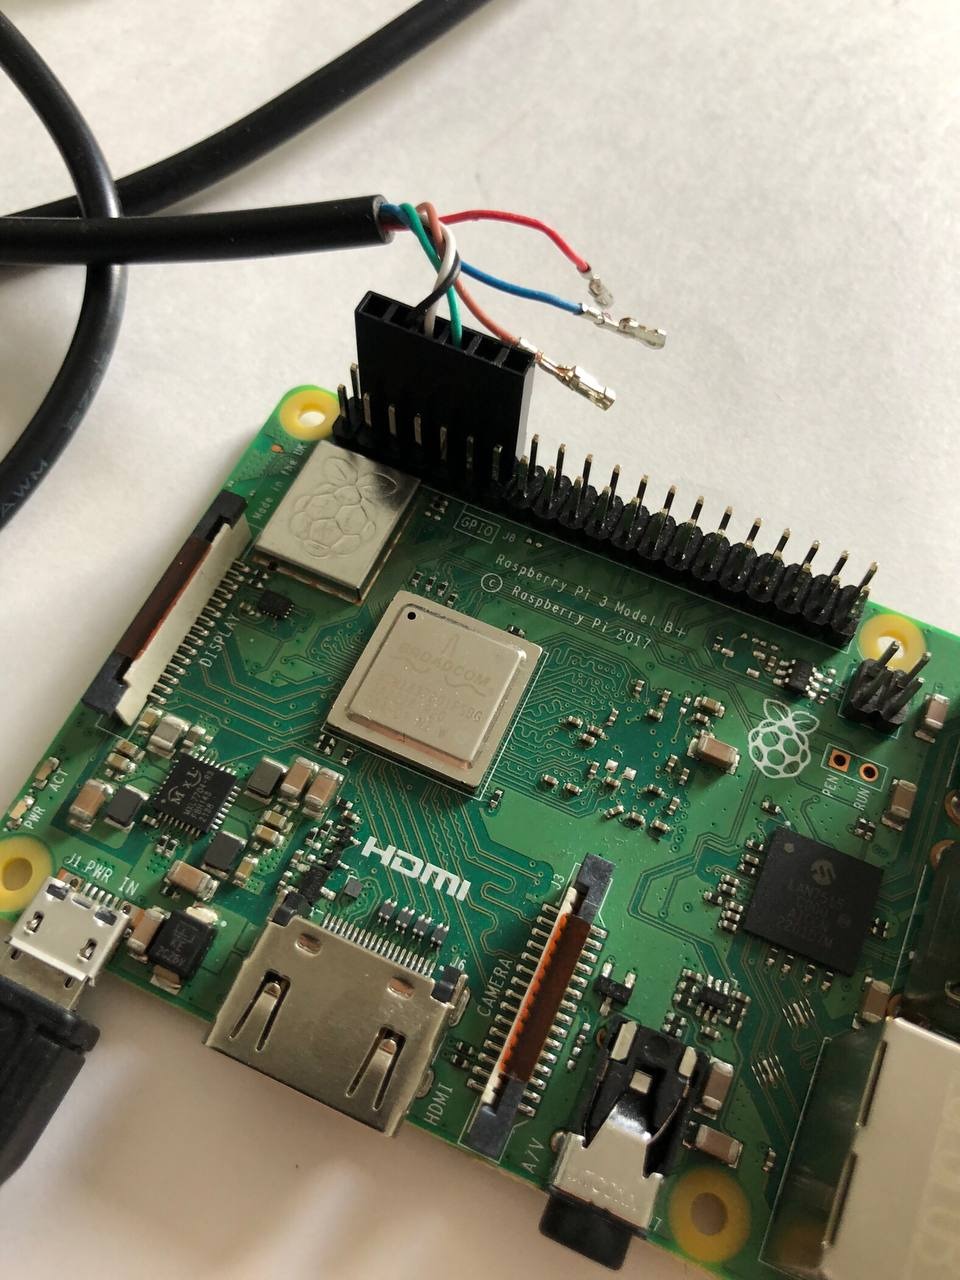
Serial (UART) Trigger
Connect RX, TX between your system and Raspberry PI:
| Wire Color | Connection |
|---|---|
| Black | GND |
| White | TX |
| Green | RX |
PuTTY Configuration
Start Putty software, connect to the serial port with the specified parameters:
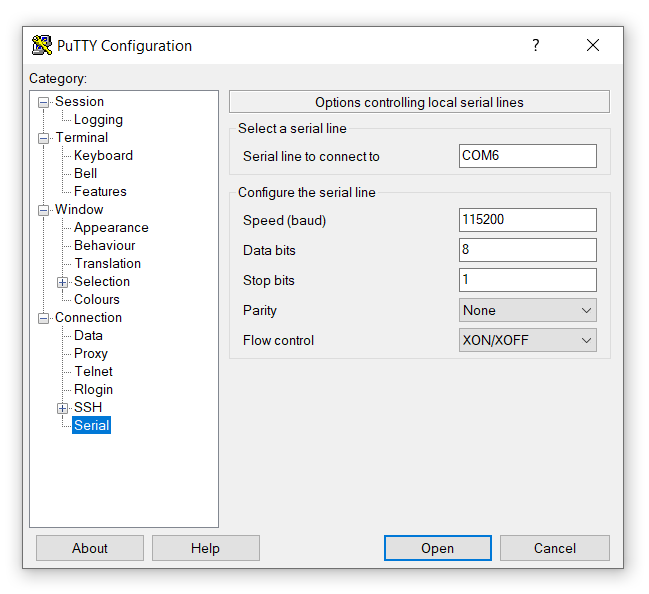
And send data with a \n newline ending.
Data Format
| Command | Description |
|---|---|
#play=cue-id | Play cuelist |
#stop=cue-id | Stop cuelist |
#light=cue-id,intensity=100 | Set brightness |
#speed=cue-id,intensity=100 | Set speed |
Where:
cue-idis integer unique cue ID from cue list- Intensity is integer value from 0 to 100
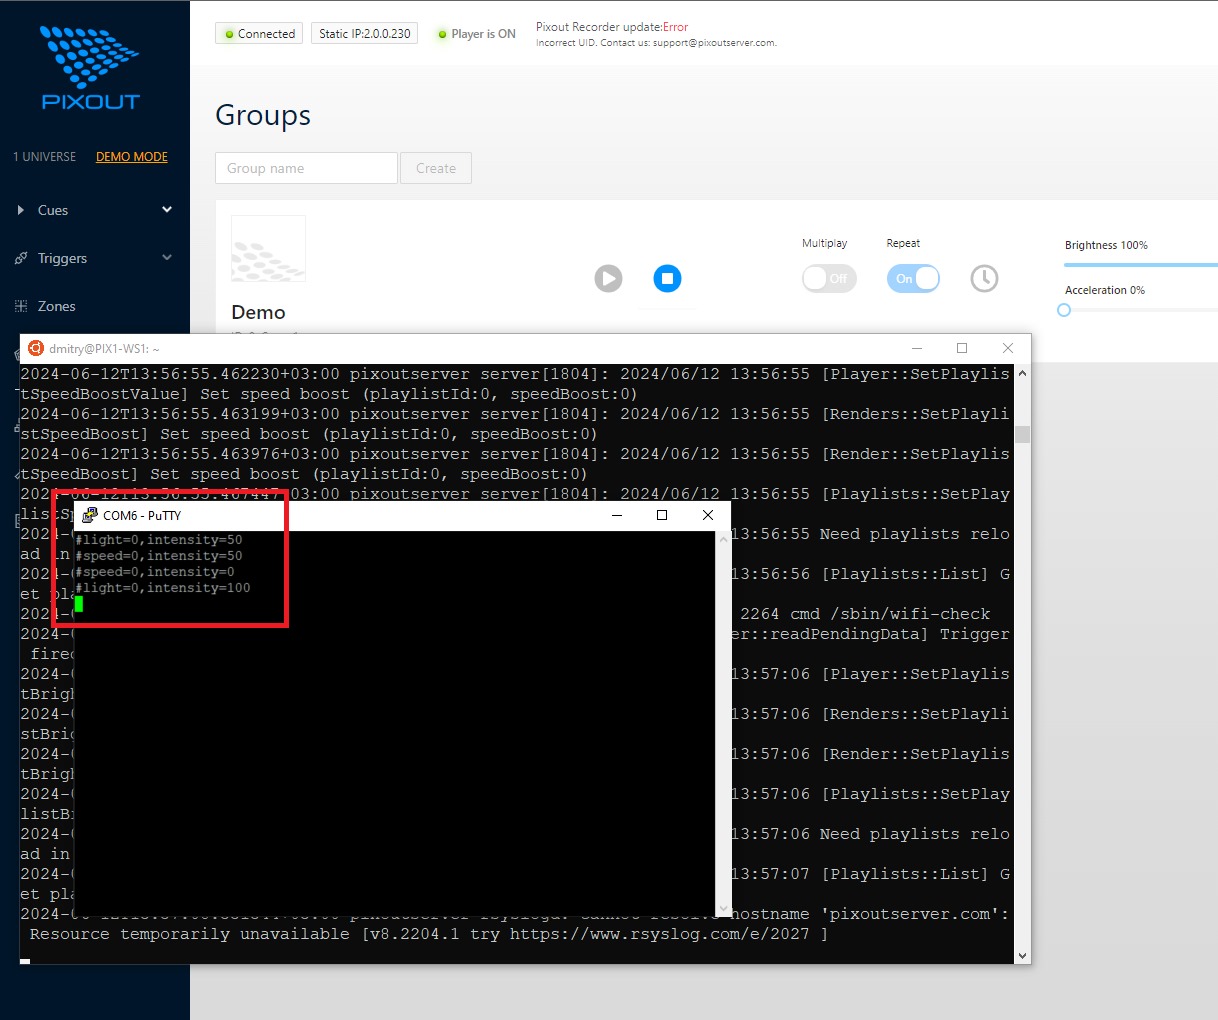
Example Commands (cue ID 0)
#play=0
#stop=0
#light=0,intensity=50
#speed=0,intensity=50
#speed=0,intensity=0
#light=0,intensity=100
(Pixout 16) GPIO pin will be busy for serial and can't be used